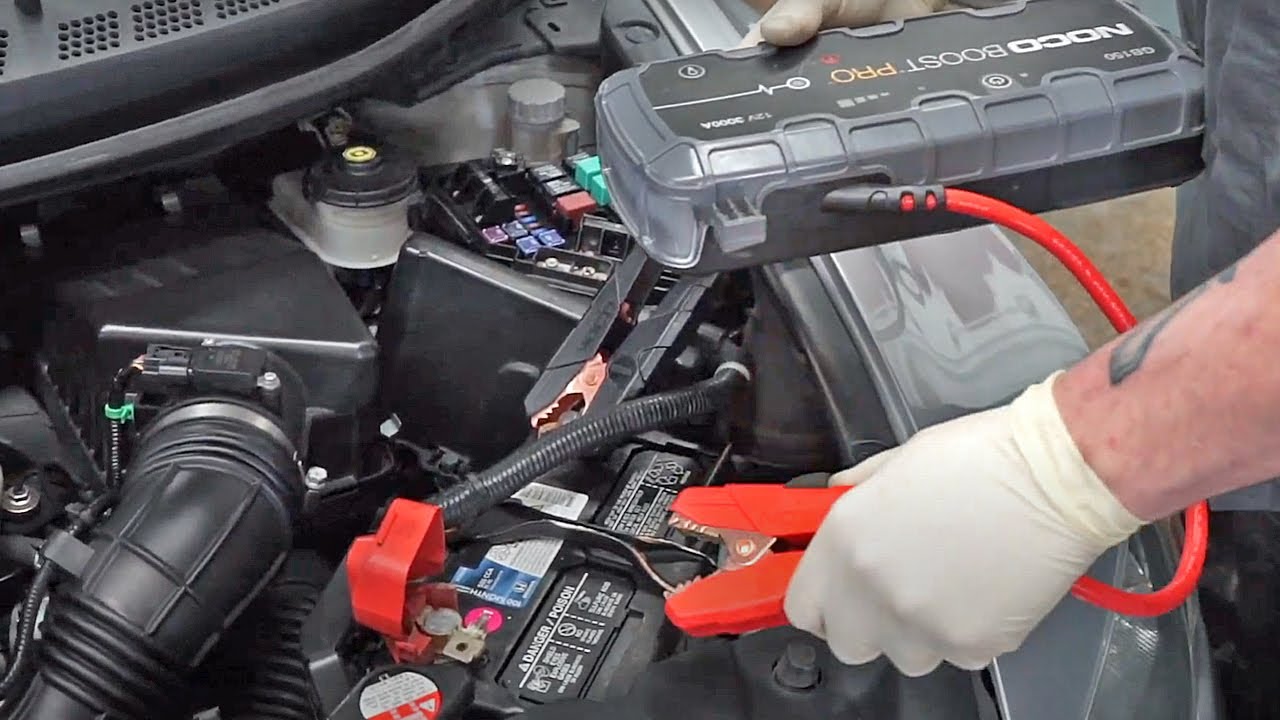
To jumpstart a Honda Pilot, attach the red jumper cable clamp to the positive post of the dead battery, then attach the black clamp to an unpainted surface on your car’s frame. When it comes to jumpstarting a Honda Pilot, the process requires a few simple steps.
First, find a driver willing to help and park both cars with the hoods facing each other. Then, open both hoods and locate the batteries. Attach the red jumper cable clamp to the positive post of the dead battery, then attach the other end to the positive terminal of the charged battery.
Next, attach the black jumper cable clamp to the negative post of the charged battery, and finally, attach the other end to an unpainted surface on your car’s frame. By following these steps, you’ll be able to successfully jumpstart your Honda Pilot and get back on the road quickly.
Understanding Jumpstarting A Honda Pilot
To jumpstart a Honda Pilot, start by attaching the red clamp to the positive post of the dead battery, then attach the red clamp to the positive terminal of the charged battery. Next, attach the black clamp to the negative pot of the charged battery and hook the final black clamp to an unpainted surface on your car’s frame.
Locating The Car Batteries
When jumpstarting a Honda Pilot, it’s essential to locate the car batteries correctly. The battery in your Honda Pilot is typically located under the hood in the engine compartment.
Understanding The Jumper Cables
Understanding how to use jumper cables is crucial for a successful jumpstart. Jumper cables have red and black clamps to connect the batteries – red for positive and black for negative.
- Attach the red clamp to the positive post of the dead battery.
- Connect the red clamp to the positive terminal of the charged battery.
- Secure the black clamp to the negative post of the charged battery.
- Hook the final black clamp to an unpainted surface on your car’s frame.
By following these steps correctly, you can jumpstart your Honda Pilot safely and effectively.
Steps To Jumpstart A Honda Pilot
When your Honda Pilot battery is dead, knowing how to jumpstart it can save the day. Follow these simple steps to get your Honda Pilot back on the road quickly.
Preparing The Vehicles
- Park the working car with the fully charged battery close to the dead Honda Pilot, but do not let the vehicles touch.
- Turn off the ignition in both vehicles and open the hoods.
Connecting The Jumper Cables
- Take red jumper cable and attach the red clamp to the positive post of the dead battery.
- Attach the other red clamp to the positive terminal of the charged battery.
- Connect the black clamp to the negative post of the charged battery.
- Attach the final black clamp to an unpainted surface on your car’s frame.
Starting The Working Car
- Start the working car and let it run for a few minutes to charge the dead battery.
Starting The Previously Dead Car
- Attempt to start the previously dead Honda Pilot. If it doesn’t start, check the connections and try again.
- Once the Honda Pilot starts, let it run for a while to ensure the battery is fully charged.
Safety Measures And Precautions
When jumpstarting a Honda Pilot, it’s crucial to adhere to safety measures and precautions to avoid potential hazards and ensure a successful jumpstart. Here are some essential safety practices to follow.
Ensuring Proper Connection
When connecting the jumper cables, ensure that the clamps fit snugly and securely onto the battery terminals to prevent them from slipping and causing a disruption in the electrical flow.
Avoiding Sparks
Avoid creating sparks near the battery as they can trigger flammable gases emanating from it. Additionally, always connect the negative cable to the engine block or another verified grounding point on the vehicle to minimize the risk of sparks near the battery.
Handling The Cables Safely
When working with jumper cables, make sure to keep them away from moving engine parts to prevent tangling or potential damage. Handle the cables with care to avoid causing any physical harm to yourself or the vehicle.
Credit: www.piloteers.org
Common Mistakes To Avoid
To jumpstart a Honda Pilot, ensure to connect the red clamp to the positive battery post and the black clamp to an unpainted car frame surface. Avoid common mistakes such as connecting the black clamp to the negative post and starting the car.
Always consult the vehicle manual for specific instructions.
Incorrect Cable Connection
One of the most common mistakes to avoid when jumpstarting a Honda Pilot is incorrect cable connection. It is crucial to properly connect the jumper cables to ensure a successful jumpstart and avoid any electrical damage. To avoid this mistake:
- Identify the positive terminal on the dead battery and the charged battery.
- Attach the red clamp to the positive post of the dead battery.
- Attach the other end of the red clamp to the positive terminal of the charged battery.
- Next, attach the black clamp to the negative post of the charged battery.
- Finally, take the other black clamp and hook it to an unpainted surface on your car’s frame to serve as the grounding strap.
By following these steps, you can ensure that the jumper cables are correctly connected, reducing the risk of electrical mishaps and increasing the chances of successfully jumpstarting your Honda Pilot.
Ignoring Grounding Strap
Another important mistake to avoid when jumpstarting a Honda Pilot is ignoring the grounding strap. The grounding strap is crucial for a safe jumpstart as it helps redirect excess electrical current. It is important to:
- Ensure the black clamp is properly attached to an unpainted surface on your car’s frame.
- Avoid attaching the black clamp directly to the negative terminal of the dead battery, as it can cause sparks or damage the battery.
- Make sure the grounding strap is secure and has a good connection.
Ignoring the grounding strap can lead to electrical issues or damage to the vehicle’s electrical system. By properly attaching the black clamp to the car’s frame, you can ensure a safe and successful jumpstart.
Using Damaged Cables
Using damaged cables is a mistake that should be avoided when jumpstarting a Honda Pilot. Damaged cables can pose safety hazards and may not provide an adequate flow of electricity to start the dead battery. To prevent this mistake:
- Inspect the jumper cables for any signs of wear and tear, such as frayed wires or exposed metal.
- If you notice any damage, refrain from using the cables and replace them with a new set.
- Ensure the cables are in good condition and free from any defects before attempting to jumpstart your Honda Pilot.
Using damaged cables can result in ineffective jumpstarts or even damage to the vehicle’s electrical system. By using reliable and undamaged cables, you can increase the chances of successfully jumpstarting your Honda Pilot and avoid any unnecessary dangers.
Alternative Methods For Jumpstarting
To jumpstart a Honda Pilot, connect the red jumper cable to the positive terminal of the dead battery. Then, attach the black cable to an unpainted metal area on the frame for grounding. Finally, connect the other ends of the cables to a charged battery.
Using A Jump Box
Jump boxes, also known as jump starters or portable battery boosters, can be a convenient and reliable alternative to using jumper cables. These compact devices are equipped with a powerful battery that can provide the necessary power to jumpstart a vehicle. Here’s how to use a jump box to jumpstart a Honda Pilot:
- First, locate the battery of your Honda Pilot. It is usually located in the engine compartment.
- Next, ensure that both the jump box and your Honda Pilot are turned off.
- Take the positive clamp of the jump box and connect it to the positive terminal of the battery in your Honda Pilot. The positive terminal is usually marked with a “+” symbol.
- Connect the negative clamp of the jump box to a metal surface on the engine or chassis of your Honda Pilot. Avoid touching any moving parts or electrical components.
- Once everything is securely connected, turn on the jump box and wait for a few minutes to allow the battery to charge.
- After waiting for a few minutes, attempt to start your Honda Pilot. If it starts successfully, remove the clamps in the reverse order of how they were connected.
- Remember to turn off the jump box and safely store it for future use.
Using a jump box can be a convenient option, especially if you don’t have access to another vehicle or jumper cables. It’s a reliable solution that can help you get back on the road quickly and easily.
Seeking Professional Assistance
If you’re not confident in jumpstarting your Honda Pilot on your own or if you don’t have the necessary equipment, it’s always a good idea to seek professional assistance. Professional mechanics or roadside assistance services have the expertise and equipment to safely jumpstart your vehicle. When seeking professional assistance, consider the following options:
- Local mechanic: Contact a reputable local mechanic who can diagnose the issue, determine if the battery needs a jumpstart or replacement, and provide the necessary services.
- Roadside assistance: If you have a membership with a roadside assistance provider, such as AAA or your car insurance company, you can call them for help. They will dispatch a professional to jumpstart your Honda Pilot or provide other necessary assistance.
- Car dealership: Contact the nearest Honda dealership for assistance. They are familiar with Honda vehicles and can provide specialized help, including jumpstarting your Honda Pilot.
Seeking professional assistance ensures that the jumpstarting process is done correctly and safely, giving you peace of mind and preventing any potential damage to your Honda Pilot’s electrical system. Remember, it’s important to always prioritize your safety and the safety of others when attempting to jumpstart a vehicle. If you’re unsure or uncomfortable with the process, it’s best to rely on the expertise of professionals.
Issues Related To Jumpstarting A Honda Pilot
Experiencing difficulties jumpstarting a Honda Pilot? Safely connect jumper cables to the batteries’ positive and negative terminals for a successful jumpstart. Avoid painted surfaces and utilize an unpainted metal area on the frame for grounding.
Issues Related to Jumpstarting a Honda Pilot Battery Access Challenges
Battery Access Challenges
Jump starting a Honda Pilot can be challenging due to the battery’s location, which is often tucked away beneath covers and components. Accessing the battery terminals can be difficult and time-consuming. This may require removing panels or parts, adding to the complexity of the jumpstarting process.
Community Experiences
Community Experiences
Many Honda Pilot owners have shared their experiences of struggling with accessing the battery for jumpstarting. Some have noted that the location of the battery makes jump starting a frustrating and laborious task. Common difficulties include identifying the terminals and finding a suitable grounding point for the negative clamp.
Tips For Successful Jumpstarting
Learn how to successfully jumpstart a Honda Pilot with these helpful tips. Attach the red clamp to the positive post of the dead battery, connect the black clamp to an unpainted surface on the car’s frame, and you’ll be back on the road in no time.
Proper Battery Maintenance
One of the key factors in successfully jumpstarting a Honda Pilot is maintaining the battery in good condition. Regularly checking the battery’s health and charging level is essential. Ensure that the terminals are clean and free from corrosion. Dirty terminals can obstruct the flow of electricity and prevent a successful jumpstart.
Knowing The Car’s Grounding Strap Location
Another essential tip for successful jumpstarting is understanding the location of the car’s grounding strap. The grounding strap provides a direct connection to the chassis, allowing the electrical current to flow smoothly. In the Honda Pilot, the grounding strap can typically be found near the air filter box. Make sure to locate it before attempting jumpstarting.
Proper Connection Of Jumper Cables
When jumpstarting your Honda Pilot, it’s crucial to connect the jumper cables correctly. Follow these steps:
- Attach the red clamp of the jumper cable to the positive post of the dead battery.
- Connect the other red clamp to the positive terminal of the charged battery.
- Attach the black clamp to the negative post of the charged battery.
- Take the final black clamp and hook it to an unpainted surface on your car’s frame, preferably near the grounding strap location.
Remember to be cautious while connecting the cables and ensure they are secured tightly to prevent any accidental detachment during the jumpstart process.
Precautions And Additional Advice
Here are a few additional tips to keep in mind when jumpstarting your Honda Pilot:
- Always attach the positive cables (red) before the negative cables (black) to prevent any electrical sparks.
- Turn off the ignition and any unnecessary electrical devices in both vehicles before attempting jumpstarting.
- Let the charged battery run for a few minutes to provide a sufficient charge to the dead battery before attempting to start the engine.
- If the jumpstart is unsuccessful, it may indicate a more significant problem with the battery or electrical system. In such cases, it’s best to contact a professional mechanic.
By following these tips, you can ensure a successful jumpstart for your Honda Pilot and get back on the road quickly. Remember to exercise caution and prioritize safety at all times during the jumpstart process.
Credit: www.piloteers.org
Conclusion And Aftercare
To jumpstart a Honda Pilot, first, connect the red clamp to the positive post of the dead battery, followed by attaching the black clamp to the negative post. Then, connect the other red clamp to the positive terminal of the charged battery and the black clamp to an unpainted surface on your car’s frame.
After-jumpstart Battery Check
After jumpstarting your Honda Pilot, it’s crucial to conduct a battery check to ensure everything is in order.
Long-term Battery Care
Proper long-term care is essential to maintain your Honda Pilot’s battery health and longevity. Here’s how to ensure your battery lasts:
- Regularly check battery connections for any corrosion or loose fittings.
- Keep the battery clean and free of dirt and grime.
- During maintenance checks, inspect the battery for any signs of leakage or damage.
- Ensure the battery is securely mounted in place to prevent vibrations and damage.

Credit: www.carcarekiosk.com
Frequently Asked Questions
How Do I Jump-start A Honda Pilot?
To jump-start a Honda Pilot, attach red jumper cable to dead battery’s positive post, then to charged battery’s positive terminal. Connect black cable to charged battery’s negative post and attach the other end to unpainted metal on the car frame.
Where Is The Negative On A Honda Pilot Battery?
The negative on a Honda Pilot battery can be found next to the air filter box.
Where To Attach Jump Leads?
Attach the red jumper cable to the dead battery’s positive terminal. Connect the other end to the charged battery’s positive terminal. Then, attach the black jumper cable to the charged battery’s negative terminal and the other end to an unpainted metal surface on your car’s frame.
How To Jumpstart A Car Honda?
To jumpstart a Honda car: 1. Attach the red clamp to the positive post of the dead battery. 2. Attach the other red clamp to the positive terminal of the charged battery. 3. Connect the black clamp to the negative post of the charged battery.
4. Attach the other black clamp to an unpainted metal surface on the frame of the car with the dead battery. Remember to always be cautious and follow proper safety guidelines.
Conclusion
Jumpstarting your Honda Pilot doesn’t have to be a daunting task anymore. With the right knowledge and preparation, you can quickly and safely get your car back on the road. By following the simple steps outlined in this guide, you can ensure a smooth and efficient jumpstarting process.
So, next time your Honda Pilot needs a boost, you’ll be ready to tackle the situation with confidence.