
To replace a Honda Civic battery, locate the battery, remove terminals, install new battery, and reconnect terminals. Properly tighten connections.
Replacing a Honda Civic battery is a straightforward process that can be completed with basic tools in a few simple steps. By following these instructions, you can replace the battery in your Honda Civic and ensure your vehicle starts smoothly every time.
Regularly maintaining your car’s battery is essential for reliable performance and preventing unexpected breakdowns. Let’s explore the steps involved in replacing a Honda Civic battery to keep your vehicle running efficiently.

Credit: www.tiktok.com
Locating The Battery
Identifying Civic’s Battery Placement: The first step in replacing your Honda Civic’s battery is locating its position within the vehicle.
Identifying Civic’s Battery Placement
When replacing a Honda Civic’s battery, ensure you identify the exact location within the vehicle.
- Look under the hood near the engine compartment.
- Locate the rectangular plastic cover over the battery.
Ensuring Proper Access To The Battery
Before proceeding with the replacement, make sure you have easy access to the battery.
- Remove any components obstructing the battery’s access.
- Use the necessary tools like a wrench or screwdriver to aid in the removal process.
Tools Required
When replacing a Honda Civic battery, having the right tools is crucial to ensure a smooth and successful process.
The Essential Tools For The Job
1. Socket Wrench: Necessary for loosening and tightening bolts and connectors.
2. Combination Wrench Set: Useful for accessing hard-to-reach areas.
3. Battery Terminal Cleaner: Helps in maintaining clean and efficient connections.
4. Battery Post Cleaner: Ensures a secure connection between the battery and terminals.
5. Safety Gloves: Protect your hands during the process.
6. Safety Goggles: Shield your eyes from any debris or splashes.
7. Battery Tester: Verify the voltage and condition of the new battery.
8. Anti-Corrosion Spray: Prevent corrosion and prolong the battery’s lifespan.
Replacing The Battery
Replacing the battery of your Honda Civic is a straightforward process that can be done at home with the right tools and steps. In this guide, we will walk you through the necessary steps to remove the old battery and install a new one.
Removing The Old Battery
To start, you’ll need a few essential tools such as a wrench or socket set. First, ensure the car is turned off and the keys are removed. Open the hood and locate the battery, usually found in the engine bay. Next, loosen the battery bracket to release the old battery. Carefully remove the negative cable first, followed by the positive cable. After removing the cables, carefully lift the old battery out of the car and place it in a safe location.
Installing The New Battery
Before installing the new battery, ensure the terminals and cable ends are clean and free of any corrosion. Position the new battery in place and reconnect the positive cable first, followed by the negative cable. Tighten the cable ends securely to avoid any loose connections. Finally, secure the battery bracket to hold the new battery in place. Close the hood and start the car to ensure the new battery is functioning properly.

Credit: www.ifixit.com
Cleaning And Maintenance
To replace a Honda Civic battery, first, locate the battery and the necessary tools. Remove the old battery and clean the terminals. Then, install the new battery, reconnect the terminals, and start the vehicle. It’s an essential part of car maintenance to avoid being stranded.
Cleaning The Terminals
To ensure optimal performance, cleaning the battery terminals regularly is crucial. Start by disconnecting the negative cable first, followed by the positive cable.
Create a mixture of baking soda and water to scrub the terminals gently with a wire brush. This will remove any corrosion and buildup effectively.
After cleaning, dry the terminals thoroughly with a clean cloth to prevent any moisture that could lead to further corrosion issues.
Inspecting The Battery
Regularly inspect the battery for any signs of damage or leakage. Check the electrolyte levels if the battery is not maintenance-free.
Ensure the battery is securely in place and the hold-down hardware is tightened properly to prevent any movement while driving.
Testing The Battery
Use a multimeter to check the battery voltage to ensure it meets the manufacturer’s specifications. This will help you identify any issues with the battery’s performance.
If the battery fails the voltage test, consider replacing it with a new one to avoid potential breakdowns in the future.
Restarting The Vehicle
To replace the battery in your Honda Civic, start by locating the battery and removing the old one. Then, install the new battery and tighten the terminals. Finally, restart the vehicle to ensure everything is working properly. Make sure to follow the correct procedure to achieve the best results.
After successfully replacing the battery in your Honda Civic, the next step is to restart the vehicle. This process ensures that the new battery is properly connected and functioning. It’s essential to follow the correct steps to avoid any potential issues and ensure a smooth restart.
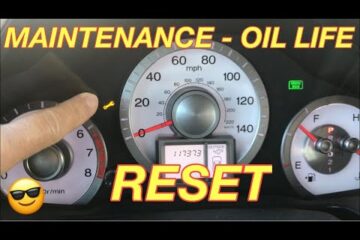
Resetting Honda Civic After Battery Replacement
To reset your Honda Civic after a battery replacement, you need to follow a simple procedure. Here’s how you can do it:
- Turn off the ignition and remove the key from the ignition switch.
- Open the hood of your Honda Civic and locate the fuse box, typically located near the battery.
- Open the fuse box cover and look for the fuse labeled “ECU” or “PCM”. This fuse is responsible for the vehicle’s computer system.
- Use a fuse puller or a pair of needle-nose pliers to remove the ECU/PCM fuse. Make sure to remember the location of the fuse for reinstallation later.
- Wait for about five minutes before reinstalling the ECU/PCM fuse. This allows the vehicle’s computer system to reset completely.
- Once the waiting period is over, carefully insert the ECU/PCM fuse back into its original position in the fuse box.
- Close the fuse box cover and firmly secure it in place.
- Now, you can start your Honda Civic by turning the ignition key and enjoy a smooth restart.
By following these simple steps, you can reset your Honda Civic’s computer system after a battery replacement, ensuring that everything functions properly. Remember, resetting the vehicle after a battery replacement is crucial to prevent any potential electrical malfunctions and maintain the optimal performance of your Honda Civic. Now that you know how to reset your Honda Civic after a battery replacement, you can confidently replace the battery and have peace of mind knowing that your vehicle is ready to hit the road again.

Credit: m.youtube.com
Common Issues
When replacing the battery in your Honda Civic, it’s essential to be aware of some common issues that may arise. This section will cover the warning lights that may appear after battery replacement and how to handle them.
Warning Lights After Battery Replacement
If you notice warning lights illuminated on your dashboard after replacing the battery in your Honda Civic, don’t panic. It’s a common occurrence due to the disruption in the electrical system. The check engine, ABS, or airbag lights, among others, might come on. This is typically a result of the vehicle’s systems resetting themselves. To address this, it’s important to perform a system reset. Consult your owner’s manual for specific instructions on how to reset the warning lights, or contact a professional for assistance if needed. In most cases, simply driving the vehicle for a short distance will allow the systems to recalibrate and the lights to turn off.
Frequently Asked Questions
How Much Is A Replacement Battery For A Honda Civic?
A replacement battery for a Honda Civic costs around [insert price here].
How To Open Honda Civic Battery Cover?
To open the Honda Civic battery cover, first, locate the battery under the hood. Then, remove the battery bracket and the negative cable. Install the new battery and replace the cover. Finally, tighten the terminals. Always consult the owner’s manual for specific instructions.
How To Reset Honda Civic After New Battery?
To reset a Honda Civic after a new battery, use a scan tool to reset the system.
Can I Replace My Car Battery Myself?
Yes, you can replace your car battery yourself by following the steps to disconnect and remove the old battery, then secure and connect the new one. Just make sure to lift it out carefully due to its weight. Regularly track your battery’s life and replace it as needed.
Conclusion
Replacing the battery in your Honda Civic is a simple task that can be done by most people. By following the steps outlined in this guide, you can save time and money by doing it yourself. Remember to disconnect the terminals properly and to tighten them securely when installing the new battery.
Regularly monitoring your battery’s life and replacing it before it fails can help prevent being stranded unexpectedly. So, go ahead and confidently replace your Honda Civic’s battery with ease.